ABBDCS800 Hardware Manual DCS800 Drives (20 to 5200 A)
avoid damage and injury.
WARNING!
• DCS800 sizes D4 ... D7: The drive is heavy. Do not lift it alone. Do not lift the
unit by the front cover. Place units D4, D4+ and D5 only on their back.
DCS800 sizes D5 ... D7: The drive is heavy. Lift the drive by the lifting lugs
only. Do not tilt the unit. The unit will overturn from a tilt of about 6 degrees.
• Make sure that dust from drilling does not enter the drive when installing.
Electrically conductive dust inside the unit may cause damage or lead to
malfunction.
• Ensure sufficient cooling.
• Do not fasten the drive by riveting or welding
Operation
These warnings are intended for all who plan the operation of the drive or operate
the drive. Ignoring the instructions can cause physical injury or death and/or damage
to the equipment.
WARNING!
• Before adjusting the drive and putting it into service, make sure that the motor
and all driven equipment are suitable for operation throughout the speed range
provided by the drive. The drive can be adjusted to operate the motor at
speeds above and below the base speed.
• Do not control the motor with the disconnecting device (disconnecting mains);
instead, use the control panel keys and , or commands via the I/O
board of the drive.
• Mains connection
You can use a disconnect switch (with fuses) to disconnect the electrical
components of the drive from the mains for installation and maintenance work.
The type of disconnect switch used must be as per EN 60947-3, Class B, so as
to comply with EU regulations, or a circuit-breaker type which switches off the
load circuit by means of an auxiliary contact causing the breaker's main
contacts to open. The mains disconnect must be locked in its "OPEN" position
during any installation and maintenance work.
• EMERGENCY STOP buttons must be installed at each control desk and at all
other control panels requiring an emergency stop function. Pressing the STOP
button on the control panel of the drive will neither cause an emergency stop of
the motor, nor will the drive be disconnected from any dangerous potential.
To avoid unintentional operating states, or to shut the unit down in case of any
imminent danger according to the standards in the safety instructions it is not
sufficient to merely shut down the drive via signals "RUN", "drive OFF" or
"Emergency Stop" respectively "control panel" or "PC tool".
• Intended use
The operating instructions cannot take into consideration every possible case
of configuration, operation or maintenance. Thus, they mainly give such advice
only, which is required by qualified personnel for normal operation of the
machines and devices in industrial installations.
If in special cases the electrical machines and devices are in-tended for use in
non-industrial installations - which may require stricter safety regulations (e.g.
protection against contact by children or similar) - these additional safety
measures for the installation must be provided by the customer during
assembly.
Note:
• When the control location is not set to Local (L not shown in the status row of
the display), the stop key on the control panel will not stop the drive. To stop
the drive using the control panel, press the LOC/REM key and then the stop
key .
Chapter overview
This chapter describes briefly the operating principle and construction of the
converter modules in short.
The DCS800
The DCS800-S size D1 - D7 are intended for controlling DC motors
Chapter overview
This chapter describes the mechanical installation of the DCS800.
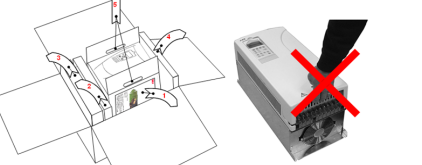
Unpacking the unit
• Open the box,
• take out shock dampers,
• separate manual and accessories.
Attention:
Do not lift the drive by the cover!
Delivery check
Check that there are no signs of damage. Before attempting installation and
operation, check the information on the nameplate of the converter module to verify
that the unit is of the correct type. The label includes an IEC rating, cULus, C-tick
(N713) and CE markings, a type code and a serial number, which allow individual
identification of each unit. The remaining digits complete the serial number so that
there are no two units with the same serial number.
See an example nameplate below.
Before installation
Install the drive in an upright position with the cooling section facing a wall. Check
the installation site according to the requirements below. Refer to chapter
Dimensions and weights for frame details.
Requirements for the installation site
See chapter Technical data for the allowed operation conditions of the drive.
Wall
The wall should be as close to vertical as possible, of non-flammable material and
strong enough to carry the weight of the unit. Check that there is nothing on the wall
to inhibit the installation.
Floor
The floor or material below the installation should be non-flammable.
Free space around the unit
Around the unit free space is required to enable cooling airflow, service and
-
 DEIF FAS-113DG Synchronisation & circuit breaker closing
 -
 DEIF FAS-115DG Synchronisation & circuit breaker closing
 -
 DEIF HAS-111DG Synchronisation & circuit breaker closing
 -
 DEIF LSU-122DG Load sharing, paralleling & operation
 -
 DEIF LSU-114DG Load sharing, paralleling & operation
 -
 DEIF LSU-113DG Load sharing, paralleling & operation
 -
 DEIF LSU-112DG Load sharing, paralleling & operation
 -
 DEIF RMF-112D Frequency relay
 -
 DEIF RMC-142D Current relay
 -
 DEIF RMC-132D Current relay
 -
 DEIF RMC-131D Current relay
 -
 DEIF RMC-122D Current relay
 -
 DEIF RMC-121D Current relay
 -
 DEIF RMC-111D Current relay
 -
 DEIF MVR-V211 Busbar Protection
 -
 DEIF MVR-T257 Transformer Differential Protection
 -
 DEIF MVR-T256 Transformer Differential Protection
 -
 DEIF MVR-T216 Transformer Differential Protection
 -
DEIF MVR-T215 Transformer Protection
-
 DEIF MVR-M257 Motor Differential Protection
 -
 DEIF MVR-M255 Motor Protection
 -
 DEIF MVR-M215 Motor Protection
 -
 DEIF MVR-M210 Motor Protection
 -
 DEIF MVR-G257 Generator Differential Protection
 -
 DEIF MVR-G215 Generator Protection
 -
 DEIF MVR-F255 Directional Feeder Protection
 -
 DEIF MVR-F215 Directional Feeder Protection
 -
DEIF MVR-F210 Feeder Protection
-
 DEIF MVR-F205 Directional Feeder Protection
 -
 DEIF MVR-F201 Basic Feeder Protection
 -
DEIF MVR-200 series Medium Voltage Relay
-
 DEIF MDR-2 Multi-differential relay
 -
 DEIF LMR-122D Loss of mains relay
 -
 DEIF LMR-111D Loss of mains relay
 -
 DEIF APU-4 Advanced G59 and G99 protection unit
 -
 DEIF iE 650 PLC - The most robust programmable automation controller available
 -
 DEIF iE 350 PLC - Programmable Automation PLC Controller
 -
 DEIF iE 250 PLC Versatile and modular intelligent energy PLC controller
 -
 DEIF PPM-3 EDG Protection and Power Management
 -
 DEIF AGC 3X 4198000234E AUTOMATIC GENSET CONTROLLER
 -
 SAUTER ASF123 Damper actuator with spring return
 -
SAUTER ASF122 Damper actuator with spring return
-
SAUTER ASF113F122 Damper actuator with spring return
-
SAUTER ASF113F120 Damper actuator with spring return
-
SAUTER ASF112F122 Damper actuator with spring return
-
SAUTER ASF112F120 Damper actuator with spring return
-
 SAUTER ASM 124/134 series - ASM134F130 Damper actuator
 -
SAUTER ASM 134 series - ASM134SF132 Damper actuator
-
SAUTER ASM 124/134 series - ASM124SF132 Damper actuator
-
SAUTER ASM 124/134 series - ASM124F122 Damper actuator
-
SAUTER ASM 124/134 series - ASM124F120 Damper actuator
-
 SAUTER Valve actuator ASM 105S/115S series ASM115SF152
 -
SAUTER Valve actuator ASM 105S/115S series ASM105SF152
-
SAUTER Valve actuator ASM 105S/115S series ASM115SF132
-
SAUTER Valve actuator ASM 105/115 series ASM105SF132
-
 SAUTER Valve actuator ASM 105/115 series ASM115F122
 -
SAUTER Valve actuator ASM 105/115 series ASM115F120
-
SAUTER Valve actuator ASM 105/115 series ASM105F122
-
SAUTER Valve actuator ASM 105/115 series ASM105F120
-
SAUTER Valve actuator ASM 105/115 series ASM105F10
-
 SAUTER AKF113S Rotating actuator AKF 112/113 series
 -
SAUTER AKF113F122 Rotating actuator AKF 112/113 series
-
SAUTER AKF113F120 Rotating actuator AKF 112/113 series
-
SAUTER AKF112F122 Rotating actuator AKF 112/113 series
-
SAUTER AKF112F120 Rotating actuator AKF 112/113 series
-
 SAUTER AKM115SAF332: Smart Actuator for ball valve, BACnet/IP
 -
 SAUTER AKM115SAF232 Rotating Actuator AKM 115SA Smart Actuator
 -
 SAUTER AKM115SF152 Rotating Actuator AKM 105S/115S Series
 -
SAUTER AKM115SF132 Rotating Actuator AKM 105S/115S Series
-
SAUTER AKM105SF132 Rotating Actuator AKM 105S/115S Series
-
 SAUTER AKM115F122 Rotating actuator AKM 105/115 series
 -
 SAUTER Rotating actuator AKM 105/115 series AKM115F120
 -
SAUTER Rotating actuator AKM 105/115 series AKM105F122
-
SAUTER Rotating actuator AKM 105/115 series AKM105F120
-
 SAUTER Continuous actuator for unit valves, with stroke AXS215S
 -
 SAUTER Linear valve actuator AXT/AXS series AXT211
 -
SAUTER Linear valve actuator AXT/AXS series AXT201
-
 SAUTER Linear valve actuator AXM/AXF series AXF217S
 -
SAUTER Linear valve actuator AXM/AXF series AXM217S
-
SAUTER AXM217SF404 is an electric actuator for unit valves.
-
SAUTER AXM217SF402 is an electric actuator for unit valves.
-
SAUTER Linear valve actuator AXM/AXF series AXM217
-
 SAUTER Linear valve actuator AVF 124/125 series AVF125S
 -
SAUTER Linear valve actuator AVF 124/125 series AVF124S
-
SAUTER Linear valve actuator AVF 124/125 series AVF124S
-
 SAUTER AVM322S-R Linear valve actuator AVM 234S series
 -
SAUTER AVM322-R Linear valve actuator AVM 234S series
-
SAUTER AVM322SF132 Linear valve actuator AVM 234S series
-
 SAUTER AVM321SF132 Linear Valve Actuator
 -
 GE Power Conversion P112-6053 Advanced Micro Controller (AMC2)
 -
GE Power Conversion P111-6053 Advanced Micro Controller (AMC2)
-
 GE Power Conversion P110-6053 Advanced Micro Controller (AMC2)
 -
 GE Power Conversion P122-6052 Advanced Micro Controller (AMC2)
 -
GE Power Conversion P121-6052 Advanced Micro Controller (AMC2)
-
 GE Power Conversion P112-6152 Advanced Micro Controller (AMC2)
 -
GE Power Conversion P110-6152 Advanced Micro Controller (AMC2)
-
GE Power Conversion P112-6052 Advanced Micro Controller (AMC2)
-
GE P106-6052 AMC2 Advanced Micro Controller Unit
-
SAUTER AVF234SF232 Linear valve actuator AVM 234S series
-
SAUTER AVF234SF132 Linear valve actuator AVM 234S series
-
 SAUTER Linear valve actuator AVM 234S series AVM234SF132-6
 -
SAUTER Linear valve actuator AVM 234S series AVM234SF132-5
-
SAUTER Linear valve actuator AVM 234S series AVM234SF132
-
SAUTER Linear valve actuator AVM215SF132-7
-
SAUTER Linear valve actuator AVM215SF132R
-
 Linear valve actuator AVM 115SA Smart Actuator AVM115SAF332
 -
Linear valve actuator AVM 115SA Smart Actuator AVM115SAF232
-
 SAUTER Linear valve actuator AVM 105S/115S series AVM115SF132
 -
SAUTER Linear valve actuator AVM 105S/115S series AVM105SF132
-
 SAUTER AVM115F901 Linear Valve Actuator
 -
SAUTER AVM115F122 Linear Valve Actuator
-
SAUTER AVM115F120 Linear Valve Actuator
-
SAUTER AVM105F122 Linear Valve Actuator
-
 SAUTER AVM105F120 Linear Valve Actuator
 -
 SAUTER AVM105F100 Linear Valve Actuator
 -
 AEROTECH SM Series High-Performance Stepper Motors
 -
 AEROTECH BLMSC Series Linear Motors
 -
 AEROTECH Custom Linear Motors
 -
 AEROTECH BMS Series Brushless, Slotless Rotary Motors
 -
 AEROTECH BM Series Brushless Rotary Motors
 -
 AEROTECH BLMX Series Linear Motors
 -
 AEROTECH BLMH Series Linear Motors
 -
 AEROTECH BLM Series Linear Motors
 -
 AEROTECH BLMC Series Linear Motors
 -
 AEROTECH BLMUC-143 Linear motor forcer with thermistor
 -
AEROTECH BLMUC-111 Linear motor forcer with thermistor
-
AEROTECH BLMUC-95 Linear motor forcer with thermistor
-
AEROTECH BLMUC-79 Linear motor forcer with thermistor