schneiderSun™ StorEdge™ UniPack User’s Guide
as the drive for 24 hours.
Write-Protection
When the tape is write-protected (read-only mode), data on the tape cannot be
overwritten. When the tape is write-enabled, you can write and store new data on
the tape.
For information on how to write protect a tape cartridge, refer to your tape drive
specifications sheet or documentation that is contained with the tape cartridge.
Tensioning Pass
When you insert a blank 1/4-inch tape cartridge or one that has been stored for a
long time, run it from one end to the other. This tensioning pass ensures an even
distribution of tension throughout the tape. See the Solaris Handbook for SMCC
Peripherals for specific instructions about tensioning a tape cartridge.
Handling and Storage
■ Avoid touching the surface of the tape.
■ Make sure the cartridge is at room temperature before using it.
■ Keep cartridges away from anything magnetic.
■ Keep cartridges out of direct sunlight and sources of heat, cold, or humidity.
■ Rewind a cartridge before storing.
■ Store cartridges in a dust-free environment, upright on edge rather than flat.
■ Maintain stable temperature for long term cartridge storage.
■ Maintain stable humidity (near 50%) for long term cartridge storage.
Hard Drive Replacement
To replace a hard disk drive in a Sun Sun StorEdge UniPack enclosure, you must
shut down the operating system, turn off the power, and open the enclosure before
replacing the drive.
▼ Prepare the Workstation
1. Halt the operating system.
See the Solaris™ Handbook for SMCC Peripherals that came with your system.or on the
Solaris AnswerBook® on-line documentation for the appropriate command.
2. Turn off the power to the workstation and peripherals.
Be sure the AC power cord to the wall socket remains connected for electrical
grounding.
▼ Open the Disk Drive Enclosure
1. If you have a security cable, remove it and the screw at the center rear of the drive.
a. Open the enclosure by pressing inward on the side tabs and lifting the rear of
the cover.
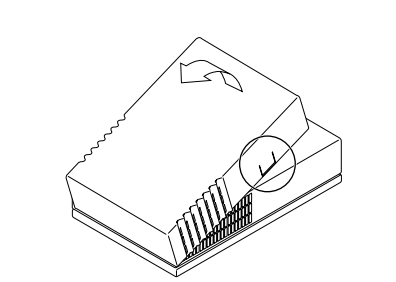
FIGURE 2-1 Opening the Enclosure
2. Carefully remove the acoustic foam if any, that covers the disk drive.
The foam has finger holes for easy removal.
Caution – Do not remove the power supply unless you are a trained service
provider.
3. Wrap a wrist strap several times around your wrist and attach the copper end to
the unpainted surface of the power supply
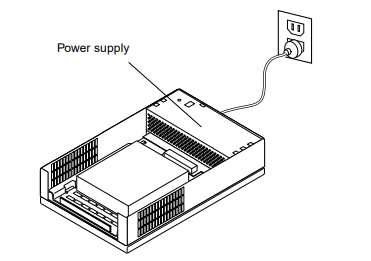
FIGURE 2-2 Sun Sun StorEdge UniPack Without the Cover
▼ Remove the Old Drive
1. Look at the bottom of the drive enclosure.
2. Pull out the tab on the bottom of the base as you pull the bracket forward gently.
The front of the bracket has a finger pull.
3. Remove the drive and bracket from the enclosure.
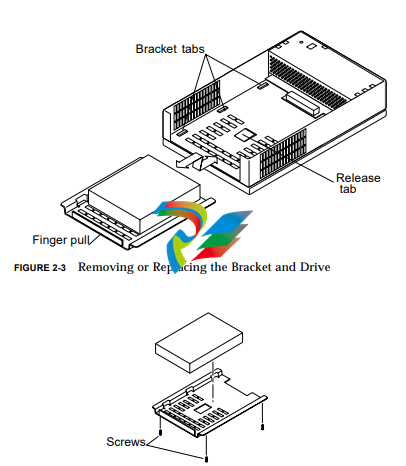
FIGURE 2-4 Removing or Attaching Bracket and Drive
4. Remove the old hard drive from the bracket.
Four screws at the bottom secure the drive.
▼ Install the New Drive
1. Unpack the new drive and place it upside down on the antistatic bag it came in.
2. Secure the new drive to the drive bracket with the four screws.
3. Place the drive and bracket into the enclosure just inside the front.
4. Slide the drive and bracket under the six bracket tabs.
Release the tab on the underside of the case to ease the insertion. The drive
connector locks into the connector on the power supply.
▼ Replace the Cover
1. Remove the wrist strap and check that the enclosure is clear of anything but the
drive and power supply.
2. Replace the acoustic foam, if any, over the disk drive.
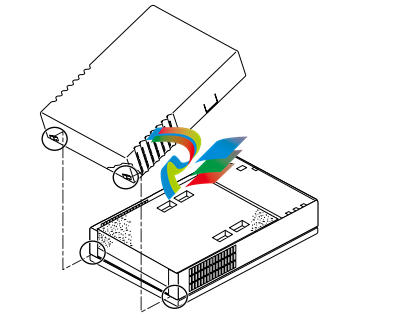
3. Replace the cover.
a. At the front, fit the small hooks at each side of the cover through the holes in
the metal casing.
b. Lower the cover until it clicks into place
▼ Connect the Cables and Turn the Power On
1. Connect the cables.
 2. Turn on the power to the peripherals and the workstation
CD-ROM or Tape Drive
Replacement
To replace a CD-ROM or tape drive in a Sun Sun StorEdge UniPack enclosure, you
must shut down the operating system, turn off the power, and open the enclosure
before replacing the drive.
▼ Prepare the Workstation
1. Halt the workstation operating system.
See the Solaris™ Handbook for SMCC Peripherals that comes with your system. You
can also find the handbook on the Solaris AnswerBook® on-line documentation.
2. Turn off the power to the workstation and peripherals.
Be sure the AC power cord between the drive and the wall socket remains connected
for electrical grounding.
3. Disconnect the cable between the drive and the workstation.
▼ Open the Drive Enclosure
1. If you have a security cable, remove it and the screw at the center rear of the drive.
2. Open the drive enclosure by pressing inward on the side tabs and lifting the rear
of the cover.
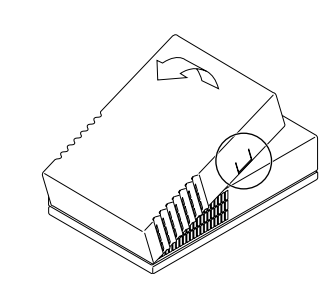
FIGURE 3-1 Removing the Enclosure Cover
Caution – Do not remove the power supply unless you are a trained service
provider.
3. Wrap a wrist strap several times around your wrist and attach the copper end to
the unpainted surface of the power supply.
▼ Remove the Old Drive
1. Look at the bottom of the drive enclosure.
2. Pull out the tab while pulling the drive and bracket forward.
The internal cables remain connected to the drive.


