
Foxboro E69F Current-to-Pneumatic Signal Converter
Figure 8.
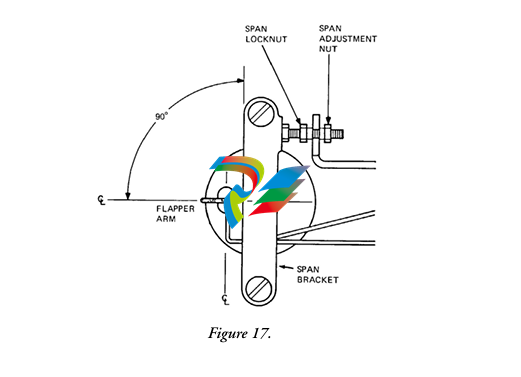
4. Loosen 5/16-inch bellows locknut. Note reference line on bellows. Rotate bellows1 so that reference line moves toward motor to decrease span or away from motor to increase span until the error is within ±2%. Tighten bellows locknut.
Repeat Steps 2 and 3. 5. SeeFigure 99. Loosen the 5/16-inch span locknut and turn the 5/16-inch span adjustment nut a proportional amount (noted in Step 3) based on the following: 1/6 of a turn (point to point on the hexagonal nut) corrects the error by 0.5%.
1. Bellows Assembly is on an eccentric.
7
MI 018-430 – June 2005
CAUTION
The span locknut must be loosened prior to span adjustment. Do not force nuts against each other to make small span changes. Forcing nuts together could result in
stripping of threads.
6. Disregard output changes that occur when span adjustment is made. Tighten span locknut.
CAUTION
Do not overtighten span locknut when locking in place as threads could become
stripped.
Figure 9.
Figure 10.
7. Apply 12 mA (50%) input to converter and adjust output (zero screw) to 60 kPa or 9 psi (50%).
8
MI 018-430– June 2005
8. Apply 20 mA (100%) input and check output for 100 kPa or 15 psi (100%). If output is not correct, repeat Steps 5 through 7.
9. Apply 4 mA (0%) and check output for 20 kPa or 3 psi (0%). If necessary, readjust zero screw for correct output.
10. Apply 100% input and check output. If output is not correct, repeat Steps 5 and 8 until both 0% and 100% outputs are correct.
Maintenance
Relay Maintenance
To Remove Relay
Remove the two large screws and pry off relay. SeeFigure 1111. A gasket is supplied with each replacement relay. For maintenance details, see Instruction MI 011-493 (Model 40G) or MI 011-491 (Model 40D).
CAUTION
If converter is equipped with explosionproof cover, three flame arresters are present.
Arresters must remain in place for explosionproof protection.
Figure 11.
To Clean Restrictor
Remove relay. See“To Remove Relay” procedure.
Clean by inserting a 0.1 mm (0.005 in) diameter wire (or Foxboro cleaning wire, Part 0042527) through orifice.
9
MI 018-430 – June 2005
Converter Modifications
NOTE
Foxboro does not consider the following modifications a field conversion. They are considered factory modifications due to the complexity of the procedures and the large amount of time required to perform them. If the modifications must be made in the field, use the following procedures and contact Foxboro for additional
assistance.
To Reverse Converter Action
The existing action of the converter is indicated by the marking on the exposed top of the motor cover: INC-INC (increasing input produces an in
creasing output), or INC-DEC (increasing
input produces a de
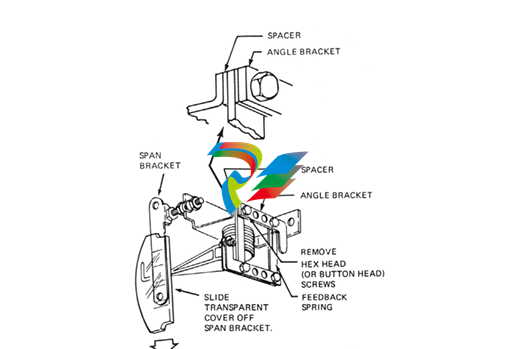
creasing output). When reinstalling the motor (Step 9 below), the exposed marking on the motor cover must indicate the desired action. 1. Disconnect instrument from installation (input wiring, air lines, and mounting bolts). 2. Remove two screws holding span bracket. SeeFigure 1212.
Figure 12.
3. Remove two screws holding feedback assembly (with bellows). Note routing of tubing for later replacement.
NOTE
Do not remove mounting plate from feedback assembly. Remove as a unit.
4. Lift aside feedback assembly (do not damage nozzle) to expose spring on bottom of case. Slide transparent cover off span bracket as shown inFigure 1313. Unhook spring from motor bracket.
(For convenience, feedback assembly can be removed entirely by disconnecting tubing. Note identification of tubing for later reconnection.)
10
MI 018-430– June 2005
5. On feedback assembly, remove two hex head (formerly buttonhead) screws. Interchange locations of angle bracket and spacer. SeeFigure 1313.
Reinstall hex head screws and tighten to a torque of 3.4 to 4.0 N•m (30 to 35 lb•in). Switching locations of angle bracket and spacer allows the Ni-Span angle bracket to correct for temperature induced errors in the INC-DEC mode.
Figure 13shows parts in INC-INC arrangement.
Figure 13.
6. Remove hex columns (use 5/16-inch wrench), and lift off motor pivot plate. SeeFigure 1212.
7. Lift out motor. Carefully lift flapper straight up from flapper arm on motor. Do not deform flapper. Holding on to flapper arm on other end of motor while removing will prevent internal motor flexure deformation.
8. Remove two screws holding bracket to bottom of motor. SeeFigure 1414. Invert motor and reinstall bracket (on side of motor that was formerly on top).
11
MI 018-430 – June 2005
Figure 14.
9. Wind excess wire clockwise around motor and carefully place motor into position in the case assuring that bottom arm is
-
 Beckhoff Nail Operating Terminal CP7032-1031-0010
 -
 Beckhoff AM8042-0EH1-0000 Servomotor 4.10 Nm (M0), F4 (87 mm)
 -
 Beckhoff EK9300 Beckhoff CPU Module
 -
 Beckhoff CP3224-0020 Multitouch-Panel-PC
 -
 Beckhoff CP2712-0000 12.1" 24VDC Touch Screen WMD0
 -
 BECKHOFF CX5240-0195 / 0000289234 Embedded PC 40 GB CFast Card
 -
 Beckhoff CP6932-1000-0000 Control Panel
 -
 BECKHOFF CX5120-0121 PLC Module
 -
 Beckhoff EL3218 | EtherCAT Terminal, 8-channel analog input
 -
 Beckhoff C6640-0050 | Control cabinet Industrial PC
 -
 Beckhoff Cx5130-0120/4GB Embedded-PC
 -
 BECKHOFF CX2030-0122 PLC PROCESSOR
 -
 BECKHOFF CX5020-0122 Controller Module
 -
 Beckhoff CP3915-0000 Multitouch Panel
 -
 BECKHOFF EL3014 | EtherCAT Terminal
 -
 BECKHOFF Industrial Computer c6920-1057-0030
 -
 Beckhoff CX5130-0141/4GB CX5130-0141 Embedded PC
 -
 Beckhoff C6240-1052-0040 4-086-06-3073 Industrial Computer
 -
 Beckhoff CX5140-0135 /4GB High-Performance Embedded Industrial PC
 -
 Beckhoff C6515-1001-0000 Industrial PC
 -
 Beckhoff AX5103-0000-0200 - Digital Compact Servo Drives
 -
 Beckhoff CX2030-0130-1003/4GB Basic CPU module
 -
 Beckhoff AX8620-0000 Power Supply Module
 -
 Beckhoff CX9020-0111 module with
 -
 Beckhoff EL7332 PLC Module
 -
 BECKHOFF CP7709-0001-0020 HMI
 -
 Beckhoff CX5120-0155/2GB Embedded PC
 -
 BECKHOFF CP7037-1037-0010 OPERATOR INTERFACE TOUCHSCREEN
 -
 Beckhoff EK9000 | ModbusTCP/UDP Bus Coupler
 -
 Beckhoff Touch Panel Screen CP6020 -0000-0000
 -
 Beckhoff CX2020-0121 Module FAST Shipping
 -
 Beckhoff CX2030-0125 Basic CPU Module
 -
 Beckhoff CP3918-0000 Multi-Touch 18.5" Control Panel
 -
 Automotion LC4A00010 DC BL Motor Control, ATS, Sub Assy, SCP, 115VAC,
 -
 500T-115VAC - VAS ENGINEERING - DORIC 500 SERIES DIGITAL TEMP INDICATOR
 -
 Honeywell X-DCS2000/EN Digital Integrated System Manager 50/60Hz 100-240V #4
 -
 Kollmorgen S60600 Servostar600 606-Fan 4 kVA, 6 A, 3 X 230 - 480 V
 -
 ABB XZ C828 A101 Didt Dioder Snubber 3BHE039453R0101
 -
 ABB 3BHB027232R0001 1-Phase Charging Transformer
 -
 ABB 3BHE006412R0101 Circuit Board UFC762AE101
 -
 ABB XVC770BE101 3BHE021083R0101 Circuit Board
 -
 ABB 3BHE021887R0101 (Model: UBCC717BE101 / UBC717BE101) is an advanced
 -
 ABB 3BHE032593R0001 Isolated Power Supply
 -
 ABB 3BSC610023R0001 POWER SUPPLY SD812
 -
 Beckhoff C6650-0060 | Control cabinet Industrial PC
 -
 Beckhoff CP2916-0000 Industrial HMI Display Panel
 -
 Beckhoff AM8053-0L2B-0000 Servomotor 15.4 Nm (M0), F5 (104 mm)
 -
 Beckhoff CP6202-0001-0020 Industrial Panel PC
 -
Beckhoff CX2020-0120 Plc Module
-
 Beckhoff CX1010-0111 BASIC CPU MODULE
 -
 Beckhoff C6017-0010 | Ultra-compact Industrial PC
 -
 BECKHOFF CX2040-0155 Plc Module
 -
 Beckhoff CX5120-0125 Embedded PC
 -
 BECKHOFF C6930-0040 INDUSTRIAL CONTROL COMPUTER
 -
 Beckhoff CP6907-0001-0000 Economy Built-in Control Panel
 -
 Beckhoff CP2912-0000 Multi-Touch Built-In Control Panel
 -
 Beckhoff C6015-0010 Ultra-Compact Industrial PC
 -
 Beckhoff CX5130 | Embedded PC with Intel Atom® E3827
 -
 Beckhoff C6030-0060 Ultra-Compact Industrial PC
 -
 OMRON 3G3XV-A2007 3G3XV-A2007-NEV2
 -
 Omron NJ1019000 NJ1 programable logic controller
 -
 OMRON C120-LK202-EV1/C120LK202EV1
 -
 OMRON C200H-AD003 PLC
 -
 OMRON C200H-CPU23-E COIL 24VDC PLC
 -
 Omron C200HG - C200H-ID212- C200H-OC226 C200HW-BC101 PLC Base Unit
 -
 OMRON C200H-OC222(Output Unit),C200H-PS211(Power Supply Unit),SP001 Module Rack
 -
 OMRON C200H-RT201 PROGRAMMABLE CONTROLLER
 -
 OMRON C200HS-CPU01-E SYSMAC PROGRAMMABLE CONTROLLER
 -
 OMRON C200H-SNT31 C200H Programmable Controllers
 -
 OMRON C200HW-MC402-E Motion control unit
 -
 OMRON C200PC-ISA02-DRM-E PLC ISA bus compatible board card
 -
 OMRON C500-CT012 PLC
 -
 OMRON C500-NC103-E PLC
 -
 OMRON C500-NC222-E PLC
 -
 OMRON C500-PRW05-V1 PLC
 -
 OMRON C500-PRW06 PROGRAMMABLE CONTROLLER
 -
 OMRON C500-PS223-E 3G2A5-PS223-E PLC SYSMAC PROGRAMMABLE CONTROLLER
 -
 OMRON C500-TU001 3G2A5-TU001 PLC PLC
 -
 OMRON C60H-C1DR-DE-V1 Programmable Controllers
 -
 OMRON C60H-C5DR-DE-V1 Programmable Controllers
 -
 OMRON C60H-C6DR-DE-V1 Programmable Controllers
 -
 OMRON CJ1G-CPU44H CPU module
 -
 OMRON CJ1G-CPU45H PLC
 -
 OMRON CJ1M-CPU13-ETN V4.0 PLC PLC
 -
 OMRON CJ1W-AD041-V1 Analog input uni
 -
 OMRON CJ1W-CORT21 PLC module
 -
 OMRON CJ1W-IDP01 Input unit
 -
 OMRON CJ1W-MCH71 - MECHATROLINK-II
 -
 OMRON CJ1W-MD261 Digital I/O
 -
 OMRON CJ1W-NC413 Position control unit
 -
 OMRON CJ1W-NCF71 Position Control Units
 -
 OMRON CJ1W-PTS51 Process Simulation I/O Module
 -
 OMRON CJ1W-PTS52 Process Simulation I/O Module
 -
 OMRON CJ1W-SCU21-V1 PLC
 -
 Omron CJ1W-SCU22 Serial Communication Unit
 -
 OMRON CJ1W-TC001 CJ Series Temperature Control Unit
 -
 Omron CK3W-AX1515N Motion Controller
 -
 Omron CP1E-N60DR-D Compact PLC CPU
 -
 OMRON CP1E-NA20DT1-D PLC PLC
 -
 OMRON CP1H-X40DT-D plc PLC
 -
 OMRON CPM2C-S110C-DRT Interface module
 -
 OMRON CQM1-AD041 PLC
 -
 SAACKE F‑GDSA‑1 / F‑GDSA‑2 Feuerungsautomaten
 -
 SAACKE F-GDSA 143303 Controller SHIPS UPS
 -
 ICS Triplex T8270 Trusted 24 Vdc FanAssembly
 -
 SCHNEIDER M522220000 SA SM_DO16R 16 DIGITAL OUTPUTS MODULE
 -
 LENZ EPL10200-W EPZ-10203 CANPT010W3E
 -
 OMRON CQM1H-ADB21 PLC
 -
OMRON CQM1H-CPU61 PLC
-
 OMRON CQM1H-MAB42 PLC
 -
 OMRON CQM1-TC102 CQM1-TC101 PLC
 -
 OMRON CS1G-CPU44-EV1 PLC
 -
 OMRON CS1G-CPU44H CPU
 -
OMRON CS1H-CPU63-EV1 PLC
-
 OMRON CS1H-CPU66-V1 PLC
 -
 OMRON CS1W-CLK13 PLC communication module
 -
OMRON CS1W-EIP21 PLC
-
 OMRON CS1W-MAD44 PLC PLC
 -
 OMRON CS1W-SCU31-V1 CVM1-BC103 PLC
 -
 Omron CVM1-CPU21-V2 CPU Unit
 -
 OMRON F150-C10E-2 Vision Controller
 -
 OMRON F150-C15E-3 Vision Controller
 -
 OMRON F160-C15E VISION MATE CONTROLLER
 -
 OMRON F500-C10-ETN F500-C15-ETN Vision Sensor
 -
 OMRON F500-VS F500-S1
 -
 OMRON FH-3050 FH Vision Controller
 -
 Omron FQ2-S25050F PLC Smart Camera
 -
 Omron FQM1-MMA22 Motion Module


