DOOSANDOOSAN AC SERVO MOTOR/DRIVE VISION DVSC - TM Series
To prevent the effect of the switching noise, the motor frame terminal should be connected to
the PE terminal of the servo drive terminal block and the PE terminal of the servo drive should be
directly grounded to standard ground panel.
▶ Noise filter
Noise filter is used in order to prevent noise from the power line. Please refer to the following
conditions while installing.
(a) Separate the input and output wiring and do not tie them together or put them into the same
duct.
(b) Do not put the ground wire into the same duct with the filter output line or other signal lines.
And do not tie them together.
(c) The ground wire should be wired singly to the ground panel.
(d) If the unit contains the filter, connect the filter and the equipment ground to the base of the
unit.
2. Operation
2.1. Automatic operation
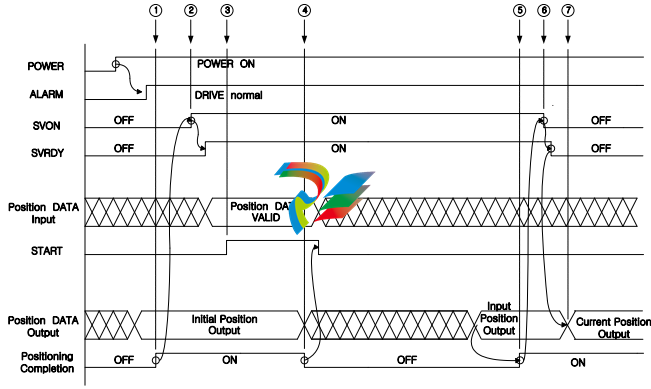
① If the drive maintains a normal state (takes 5 sec) after the POWER turns on, it outputs the initial
position data and the positioning completion signal(VPF) after it detects the initial position by the
absolute encoder.
② When the SVON signal is ON, the SVRDY signal turns ON after the inner GATE turns ON.
③ When the START signal is ON, the servo motor will rotate according to the position data.
(Maintain ON state of the START signal for about 100 ~ 200 msec.)
④ When the position movement starts, the position data 0 will be outputted with turning OFF the
VPF(Positioning Completion) signal.
⑤ When the position movement is complete, the VPF signal turns ON after the position input data is
outputted.
⑥ The host controller must turn OFF the SVON signal only after the VPF signal turns ON.
(Move to the next position after the SVRDY signal turns OFF.)
⑦ After the SVRDY and the SVON signals are turned OFF, the current position data is outputted.
2.2. Jog operation and Usage of BRAKE Signal(Magazine Port move by the jog signal)
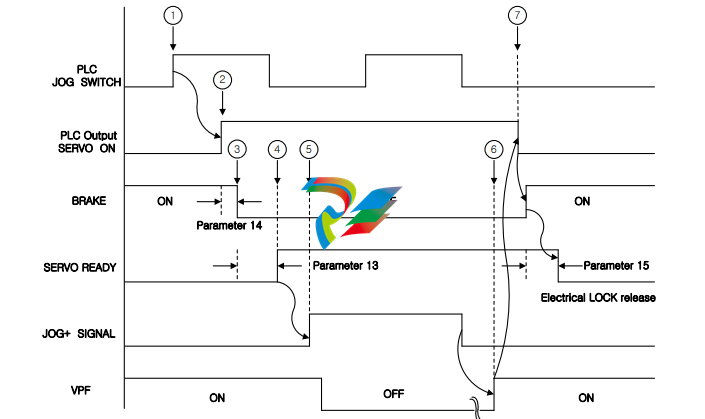
① Turn ON the Jog Switch.
② The PLC outputs the SERVO ON signal to the servo drive.
③ When the SERVO ON signal turns ON, the BRAKE release signal is outputted after the time value in
the parameter 14.
④ After the time value in the parameter 13, the SERVO READY signal is outputted.
⑤ After the SERVO READY signal is outputted, the PLC must input the JOG+ signal to the servo drive.
⑥ When the position movement is complete, the positioning completion signal(VPF) turns ON after
the position data that is increased by more than one from the previous position is outputted.
⑦ When the positioning completion signal(VPF) turns ON, the PLC turns OFF the SERVO ON signal.
Then, the servo drive turns ON the BRAKE signal and turns OFF the SERVO READY signal after the
time value in the parameter 15.
The servo drive outputs the current position data after the SERVO ON signal turns OFF.
※ In the jog mode, the motor cannot rotate over 4,000 revolutions continuously. If there is an input
over 4,000 revolutions, the motor will stop and it will not rotate. In this case, turn off the JOG+ or
JOG- signal and then turn it on again.
2.3. Parameter and Machine Origin setting method after replacement of the servo drive
At the time of the first machine assembly, it should be set the absolute encoder zero-point to the
Machine Origin. The setting method is as follows.
(These steps should be done when the external SERVO ON signal is OFF.)
2.3.1. Parameter and Machine Origin setting method of Turret/Magazine
1) Turn on the drive power.
2) Clamp the Turret.
3) Set value of the parameter 45, servo drive function selection parameter, as 0.
Please change the parameter 45 as 1 only when it needs to set as ATC because default value is 0,
Turret/Magazine. Turn the drive power OFF and then turn ON again after setting the value.
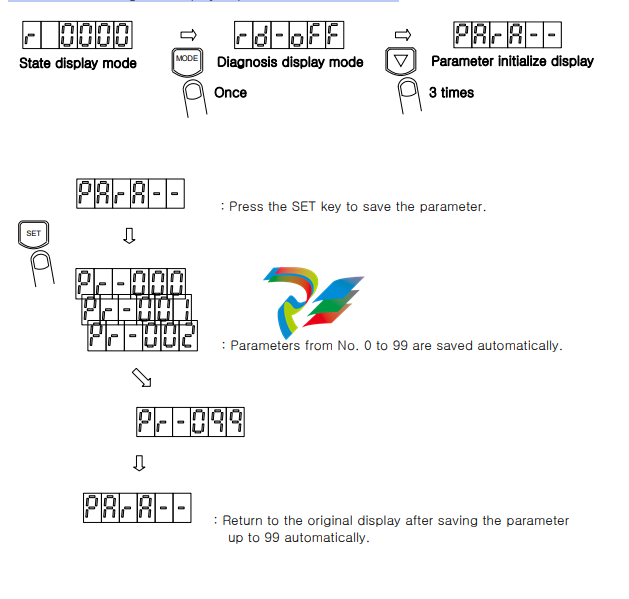
4) Initialize the parameter value.
Press the MODE key to change the display to diagnosis mode, and then press the DOWN key
three times to change the display to parameter initialize mode.
Even if an alarm occurs, it’s possible to change the display as state display mode, diagnosis display
mode, parameter setting mode, origin setting mode and alarm history display mode since version
DVSC-TM-14D-02. Also, even at alarm state, parameter or offset value setting is possible since that
version.
▶ Method of releasing the alarm state
: Once the cause of the alarm is resolved, it is possible to operate the drive by turning the power
OFF and ON again.
▶ Detection time of over load
: The operation time of the over load alarm detect circuit is as listed below.
300% ~ ; 5.5sec
275% ~ ; 6.5sec
225% ~ ; 8sec
200% ~ ; 10sec
170% ~ ; 14sec
150% ~ ; 17.5sec
140% ~ ; 20sec
130% ~ ; 25sec
120% ~ ; 30sec
3.6.3. Detailed explanation of user parameter
□0 Motor output capacity
As selection parameter of the applied motor capacity, it’s possible to select 0.8, 1.5, 1.7, 2.0, 2.3,
3.0 and 4.0kW.
0 : 1.5kW 8 : 0.8kW 17 : 1.7kW 20 : 2.0kW 23 : 2.3kW 30 : 3.0kW 40 : 4.0kW
※ Use 14A drive for motors under 3.0kW and 28A drive for motors more than 3.0kW. If not applied
properly, it may cause malfunction of the motor.
□1 Motor rotation direction
This parameter sets the rotation direction of the motor. Please select according to the structure
-
 AEROTECH SM Series High-Performance Stepper Motors
 -
 AEROTECH BLMSC Series Linear Motors
 -
 AEROTECH Custom Linear Motors
 -
 AEROTECH BMS Series Brushless, Slotless Rotary Motors
 -
 AEROTECH BM Series Brushless Rotary Motors
 -
 AEROTECH BLMX Series Linear Motors
 -
 AEROTECH BLMH Series Linear Motors
 -
 AEROTECH BLM Series Linear Motors
 -
 AEROTECH BLMC Series Linear Motors
 -
 AEROTECH BLMUC-143 Linear motor forcer with thermistor
 -
AEROTECH BLMUC-111 Linear motor forcer with thermistor
-
AEROTECH BLMUC-95 Linear motor forcer with thermistor
-
AEROTECH BLMUC-79 Linear motor forcer with thermistor
-
AEROTECH BLMUC Series Linear Motors
-
 AEROTECH Automation1 FLEX Distributed Amplifier Multi-Axis Servo Control System
 -
 AEROTECH Automation1 HXA4 6-Axis Hexapod Servo Drive
 -
 AEROTECH Automation1 iHXA4 6-Axis Hexapod Servo Drive with Motion Controller
 -
 AEROTECH Modular System Control Console
 -
 AEROTECH TV Series Transformers
 -
 AEROTECH TM Series Transformers
 -
 AEROTECH UFM Noise Filter Module
 -
 AEROTECH MFM Motor Filter Module
 -
 AEROTECH MPG Handwheel Pendant
 -
 AEROTECH Automation1 Multi-Axis Joystick
 -
 AEROTECH ETM Enhanced Throughput Module
 -
 AEROTECH Automation1 XL4s High-Speed, Single-Phase Linear Servo Drive
 -
 AEROTECH Automation1 XL2e Enhanced, Compact Linear Servo Drive
 -
 Automation1 iXL2e Enhanced, Compact Linear Servo Drive with Motion Controller
 -
 AEROTECH Automation1 XL5e Enhanced, Linear Servo Drive
 -
 AEROTECH Automation1 iXL5e Enhanced Linear Servo Drive with Motion Controller
 -
 AEROTECH Automation1 GI4 Laser Scan Head Controller
 -
 AEROTECH Automation1 SI4 Stepper Interface
 -
AEROTECH Automation1 XI4 Servo Interface
-
 AEROTECH AEROTECH Automation1 iXI4 Servo Interface with Motion Controller
 -
 AEROTECH Automation1 XC6e Enhanced, High-Power PWM Servo Drive
 -
 AEROTECH Automation1 iXC6e Enhanced, High-Power PWM Servo Drive with Motion Controller
 -
 AEROTECH Automation1 XC2 Compact PWM Servo Drive
 -
 AEROTECH Automation1 XC4 PWM Servo Drive
 -
 AEROTECH Automation1 GL4 Galvo Laser Scan Head Linear Drive
 -
 AEROTECH Automation1 XC2e Enhanced, Compact Servo Drive with PWM+
 -
 AEROTECH Automation1 XC4e Enhanced, PWM Servo Drive
 -
 AEROTECH Automation1 XR3 Multi-Axis Servo Drive Rack
 -
 AEROTECH Automation1 iXR3 Multi-Axis Servo Drive Rack with Motion Controller
 -
 AEROTECH Automation1 iXC2 Compact PWM Servo Drive with Motion Controller
 -
 AEROTECH Automation1 iXC2e Enhanced, Compact PWM+ Servo Drive with Motion Controller
 -
 AEROTECH Automation1 iXC4 PWM Servo Drive with Motion Controller
 -
 AEROTECH Automation1 iXC4e Enhanced, PWM Servo Drive with Motion Controller
 -
 AEROTECH Automation1 iPC Industrial PC with Motion Controller
 -
 AEROTECH EPICS & TANGO Drivers for Distributed Control Systems
 -
 AEROTECH .NET, C, Python & LabVIEW APIs Custom Application Develotpmen
 -
 AEROTECH Automation1 Industrial Ethernet Support
 -
 AEROTECH Automation1 iSMC Intelligent, Software-Based Motion Controller
 -
 AEROTECH Automation1 iXA4 1- 2- or 4-Axis PWM Servo Drive with Motion Controller
 -
 AEROTECH Automation1 XA4 1- 2- or 4-Axis PWM Servo Drive
 -
 CTI 2500-ADP2-DISC Discrete Wiring Adapter for Series 500
 -
 CTI 2500-ADP1 Analog Wiring Adapter for Series 500
 -
 CTI 2500C-RADP-RS485 Remote Base Controller Adapter for Series 500
 -
 CTI 2500C-RADP-RBC Profibus RBC Adapter for Series 500
 -
 CTI 2500C-PADP-120V 120VAC 50W Power Supply for Series 500
 -
 CTI 2500-RADP RBC Adapter for Series 500
 -
 CTI 2500-R4500 520/530/DBC Adapter for Series 500 - MATURE
 -
 CTI 2500-PADP Power Supply Adapter for Series 500
 -
 CTI 2500-IADP I/O Adapter for Series 500
 -
 CTI 2500-VP15A-N4-W7 15" Flat-Panel PC with Windows® 7 Embedded
 -
 CTI 2500S-27-1750 Slice I/O, Ethernet, RS232/485. 900MHz, 2DIO / 4UAI / 2AI
 -
 CTI 2500S-26-1750 Slice I/O, Ethernet, RS232/485. 900MHz, 8DIO / 2UAI
 -
 CTI 2500S-23-1750 Slice I/O, Ethernet, RS232/485. 900MHz, 4DI / 4DO / 2UAI / 2AO
 -
 CTI 2500S-27-1550 Slice I/O, RS232/485. 2DIO / 4UAI / 2AI
 -
 CTI 2500S-26-1550 Slice I/O, RS232/485. 8DIO / 2UAI
 -
 CTI 2500S-23-1550 Slice I/O, RS232/485. 4DI / 4DO / 2UAI / 2AO
 -
 CTI 2500S-27-1050 Slice I/O, Ethernet, 2DIO / 4UAI / 2AI
 -
 CTI 2500S-26-1050 Slice I/O, Ethernet, 8DIO / 2UAI
 -
 CTI 2500S-23-1050 Slice I/O, Ethernet, 4DI / 4DO / 2UAI / 2AO
 -
 CTI 2500C-32F-CJC 32-Pin Field Wiring Connector with Cold Junction Compensation
 -
 CTI 2500C-32F 32-Pin Field Wiring Connector
 -
 CTI 2500C-8-TC Eight Thermocouple Inputs
 -
 CTI 2500C-8-RTD Eight RTD Inputs
 -
 CTI 2500C-8-RL-FC 8 Form-C Relay Outputs
 -
 CTI 2500C-8-IDO-24V 8 Isolated 24VDC Outputs
 -
 CTI 2500C-8-IDO-120V 8 Isolated 120VAC Outputs
 -
 CTI 2500C-16-DO-24V Sixteen 24VDC Digital Outputs
 -
 CTI 2500C-16-DO-120V Sixteen 120VAC Digital Outputs
 -
.png) CTI 500C-16-IDI-24V Sixteen Isolated 24V AC/DC Digital Inputs
CTI 500C-16-IDI-24V Sixteen Isolated 24V AC/DC Digital Inputs -
 CTI 2500C-16-IDI-120V Sixteen Isolated 120V AC/DC Digital Inputs
 -
 CTI 2500C-16-DIDO-SIM Sixteen Digital Input and Output SImulator
 -
 CTI 2500C-16-DI-24V Sixteen 24V AC/DC Digital Inputs
 -
 CTI 2500C-16-DI-120V Sixteen 120V AC/DC Digital Inputs
 -
 CTI 2500C-RBC-RS485 RS485 Remote Base Controller
 -
 CTI 2500C-RBC-PRF Profibus Remote Base Controller
 -
 CTI 2500C-PS-24V-35 35-Watt DC Power Supply
 -
 CTI 2500C-PS-120V-35 35-Watt AC Power Supply
 -
 CTI 2500C-R8 Eight-Slot Base
 -
 CTI 2500C-R4 Four-Slot Base
 -
 CTI 2500C-R16 Sixteen-Slot Base
 -
 CTI 2500C-2572-B Fast Ethernet TCP/IP Adapter
 -
 CTI 2500C-J750 Compact Janus PAC with 3MB Project Memory
 -
 CTI 2500C-C300 CPU with 512K User Memory
 -
 CTI 2500C-C200 CPU with 256K User Memory
 -
 CTI 2500C-C100 CPU with 128K User Memory
 -
 CTI 2500C-8-AO 8 Analog Outputs
 -
 CTI 2500C-8-AI 8 Analog Inputs
 -
 CTI 2559-FCAL Precision Calibration Connector
 -
 CTI 2559-FPC 40-Position Screw-Terminal Connector
 -
 CTI 2500-RFC PLC to RF Modem Cable
 -
 CTI 2500-40F 40-Position Standard Screw-Terminal Connector
 -
 CTI 2505 Vibration Sensor Interface Module
 -
 CTI 2554-A 4-Channel Isolated High Speed Counter Module
 -
 CTI 2553-A 2-Channel Mag Meter Input Module
 -
 CTI 2502 2-Channel High Speed Counter Input Module
 -
 CTI 2559-TC 8-Channel Thermocouple Input Module
 -
 CTI 2556-A 16-Channel Isolated Thermocouple Input Module
 -
 CTI 2556 16-Channel Isolated Thermocouple Input Module
 -
 CTI 2551-A 8-Channel Isolated Thermocouple Input Module
 -
 CTI 2559-RTD 8-Channel RTD Input Module
 -
 CTI 2557-A 16-Channel RTD Input Module
 -
 CTI 2557 16-Channel RTD Input Module
 -
 CTI 2552-A 8-Channel Isolated RTD Input Module
 -
 CTI 2534 8-Point Form-C Relay Output Module
 -
 CTI 2532 16-Point Form-A Relay Output Module
 -
 CTI 2531 32-Point Form-A Relay Output Module
 -
 CTI 2530 8-Point Form-C Relay Output Module
 -
 CTI 2562 8-Channel Analog Output Module
 -
 CTI 2560-A 8-Channel Isolated Analog Output Module
 -
 CTI 2501 8in/4out Analog Module
 -
 CTI 2558 8-Channel Analog Input Module
 -
 CTI 2555-A 16-Channel Analog Input Module
 -
 CTI 2550-A 8-Channel Isolated Analog Input Module
 -
 CTI 2599 8/16/32-Point AC Output Module