
FUSION RESEARCH Ovation Music Streamers and Players
IMPORTANT NOTICES ON OPERATION OF THIS PRODUCT
DO NOT remove the power during boot-up.
Though this is a headless unit, please note that the boot sequence can take
up to 2 full minutes. Removing the power during this process will corrupt
the image.
The system is actually a small mini-server based unit with a very robust
Linux based operating system. While it is designed to be very stable and
fault tolerate, sudden termination of power during boot-up or during music
playback should always be avoided.
PAID ACCOUNTS ARE NECESSARY
Please be aware that paid accounts are required for complete function of
some services. It is important to know that while most of the applications
are completely free, some of the services do require a paid account to
function.
Services known to require a paid account are:
Pandora
Sirius XM
Spotify
Slacker
Deezer
It is also important to note that many streaming services limit the active
streams on user accounts to one stream per account. If issues occur
during playback, please make sure that there are no other active streams
associated with that account.
REQUIRED HARDWARE FOR TROUBLESHOOTING
The following items are necessary for any troubleshooting of possible
installation and operation issues that may be encounter.
VGA Monitor
USB Keyboard
USB Thumbdrive that can be formatted
Phillips Head Screwdriver
AUDIO/VIDEO SPECIFICATIONS:
Audio Formats Supported:
FLAC & MP3 for streaming
Video Connections:
Ovation Servers are headless units, that means there is no TV display.
You will control the system through computers on the same network
and any of the many drivers that are available for Squeezebox
servers.
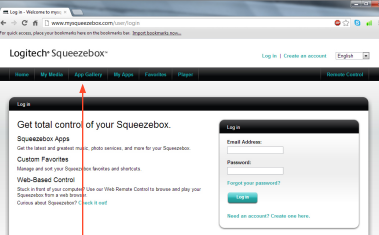
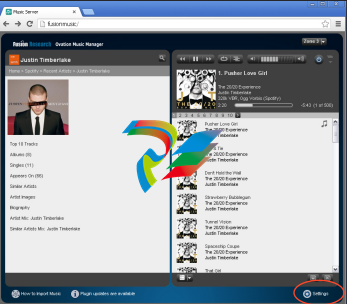
MY SQUEEZEBOX:
Because the player portion of this unit was made to be Squeezebox
compatible, a Squeezebox account is required to use this system.
To register for a free account, visit www.mysqueezebox.com.
INITAL SETUP:
Before you begin to setup any connection to a home automation control
system, add streaming app accounts or anything else, you should first
confirm that you have music playback.
Follow these steps in order:
1. Connect ethernet cable to existing router/switch
2. Plug in your OMS Server
3. Power the OMS Server on
[Note: the OMS-SIG powers on automatically when plugged in, ALL other
OMS servers require the power button to be pressed to turn the unit on.]
4. Connect the audio cables to receiver/distribution amp
VERIFYING THE AUDIO STREAMER:
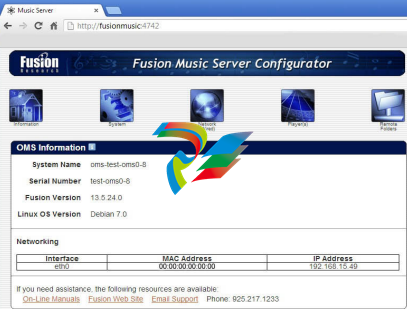
The next step is to ensure that everything is performing normally. The first
thing you should do is open a web browser on your PC. Type in ‘http://
ovation.fusionrd.net’ into your browser and the following window should
come up:

Clicking [Here it is] on the Ovation Finder Utility homepage (as seen in
the above image) will launch the finder and scan the network for attached
Ovation devices.
The Finder will return a list of the Ovation devices located on the network.

Select the desired player from the Ovation Finder Utility list and click on its
IP address. This will take you to the device’s Configurator home page where
you will complete the configuration of the device.
NOTE: After clicking the IP of the player it can take up to one minute
to access the Fusion Music Configurator home page.
INTERNET RADIO:
The quickest way to ensure your OMS
server is working properly is to select an
internet radio station.
Choose [Internet Radio] and then any of
the categories you see listed below the
tab.
Once you’ve selected the station you wish
to test, you’ll see it come up in the detail
screen. Click on the [Play] button and
you’ll see whatever is playing on the radio
station at the moment
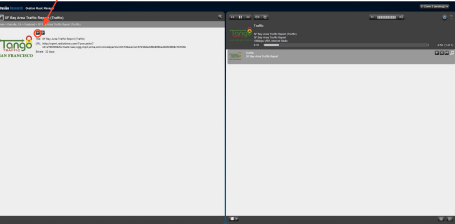
Note: If you experience low audio playback during testing make
sure that the volume of the stream is set to max by increasing
the grey bars on the volume slider.
SETTING UP AN OVATION MUSIC SYSTEM:
The Ovation Music Streamers are very powerful machines. When setup
properly, a user of the system may access music through:
One of the many Streaming Apps
Any of the thousands of Internet Radio Stations
Pointing to a remote music folder
Pointing to iTunes on a remote computer
The actual user control is very simple and intuitive to use. As you can
imagine from the list above, with all those options setting up the system
initially should be done exactly as detailed in this section of the manual.
If you are not a systems integrator or familiar with how computers work
over a network and shared folders, you may want to consider bringing in
some outside help to assist you in setting this up.
CLIENT & INTEGRATOR TOOLS:
There are two different web utilities you will be using to set the product up
as well as the www.mysqueezebox.com page.
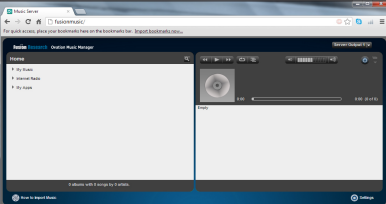
1. Ovation Music Manager [http://fusionmusic], [http://musicstream]
or [http://oms-000####] on the OMS-SIG devices. This is the consumer
interface. It will be used for managing their music as well as some basic
setting information.
NOTE: If your web browser has trouble finding this, you can simply
type in the IP address of the unit.
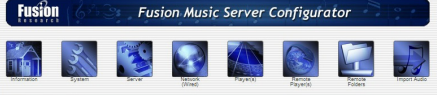
2. Fusion System Configurator accessed by using the Ovation Finder Utility
[http://ovation.fusionrd.net] and clicking on the IP of the Ovation device.
This is the integrator interface and will be used for setting up and changing
various options on the Ovation system.
NOTE: Fusion System Configurator can also be accessed by using
[http://fusionmusic:4742], [http://musicstream:4742] or [http://
oms-000####] on the OMS-SIG.
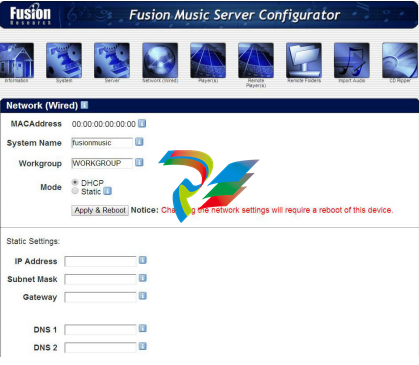
STEP ONE - CONFIGURING THE NETWORK ADDRESS:
Start with the Fusion Music Configurator, accessed through the Ovation
Finder Utility by typing [http://ovation.fusionrd.net] from any computer on
the same network.
NOTE: This unit ships with a dynamic IP address. If you’re
intending to control this unit with a home automation system,
you’ll want to set a static IP.
To set a static IP, click on the [Network] button and you’ll see the following
screen. You need to select Static IP as the option and fill in the IP Address,
Subnet Mask, Gateway & DNS1.
Then hit the [Apply & Reboot] button.
Give the server enough time to completely reboot, at which point you
should then refresh the Ovation Finder Utility page and select the device
again.
If you are using [http://fusionmusic], [htt://musicstream] or
[http://oms-000####] you will want to completely close the browser and
re-open it as your computer will remember the old IP address and by
closing the browser, you’ll clear the cache.
STEP TWO - PLAYER SECTION OF THE CONFIGURATOR:
The next step is to click on the [Player] button to continue the
configuration.
The first thing you’ll see is the individual sources you have available for you
in your particular Ovation.
You can rename them to whatever you like. (Keep in mind though, that
they will always show up in alphabetical order on any interface you are
using.)
 .
.
STEP THREE - ADDING THE OVATION SERVER TO CLIENTS
SQUEEZEBOX ACCOUNT:
Now that you’ve configured the players, you will need to add the server to
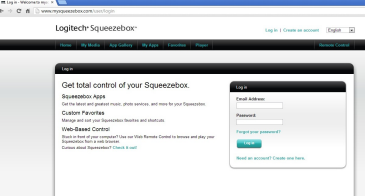
your client’s MySqueezebox account.
1. Go to the [www.mysqueezebox.com] website where you will be able
to log into the client’s existing account or create a brand new account.
2. Once you’ve logged in or created a new account, Go to the Ovation
Music Manager page. Choose [Settings] on the bottom right of the page.
Select the [mysqueezebox.com] tab. You’ll see this screen:
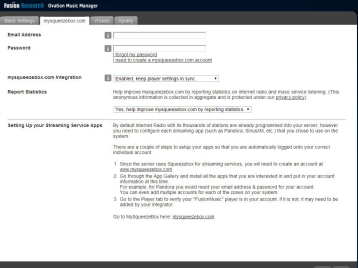
Type in the email associated to their Squeezebox account and their
mysqueezebox password. Select [Enable] from the mysqueezebox.com
integration drop down box.
Select [No], on the Report Statistics drop down box.
Hit [Apply] and you can close the screen.
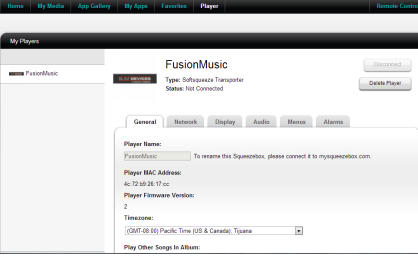
3. Finally, to ensure that it has successfully done so, click on the [Player]
tab of the www.mysqueezebox.com webpage.
You should see the screen below with an entry for each OMS player
listed. If one or more players is not listed, try playing music on that
player, then close the webpage completely and go back to it.
At this point your basic setup is finished and you are ready to use internet
radio or begin adding your streaming apps.
ADDING STREAMING APPS:
Adding streaming apps to your Ovation streamer is very simple. Begin by
going to www.mysqueezebox.com and enter your login information.
Click on the [App Gallery] tab to see all the applications available, select
the app your interested in adding and click [Install App].
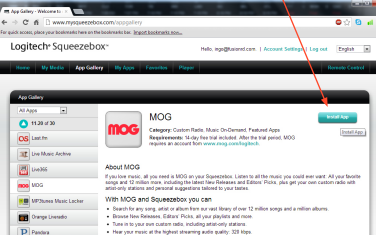
NOTE: Not all the apps you see on the Squeezebox page may work
with the Ovation system. Check www.fusionrd.com/ovation for the
latest information about available apps.
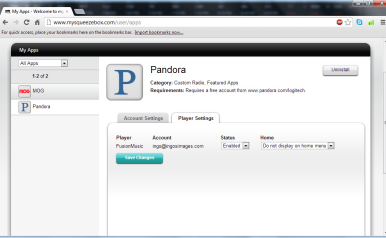
SOME APPS REQUIRE THE PAID SUBSCRIPTION SERVICE TO WORK
Many of the apps will require that you have a separate account with them.
You would visit their page separately and sign up for service. Once you
have created an account with them, place the account information in the
account settings tab.
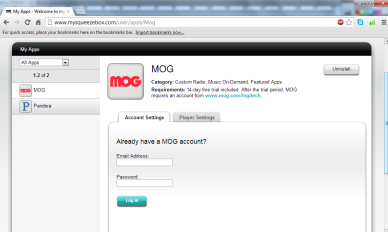
Under the player settings tab you can specify whether or not you want that
particular app to show up on the Ovation.
By clicking on the [My Apps] tab you can manage your individual apps and
uninstall them if desired. All changes made on this website will appear on
the Ovation.
ADDING THE SPOTIFY STREAMING APP:
Activating a Spotify account is done in a slightly different way from the
other streaming apps. To do this, go to the ‘home page’ for managing
your client’s music: Type in [http://fusionmusic], [http://musicstream] or
[http://oms-000####] into your browser.
Then select the [Settings] tab at the bottom of the screen. You’ll see a
Spotify tab, select it.
Check the ‘I agree’ box and click on the apply button. In a few moments
you’ll see a new screen pop up.
ACTIVATING SPOTIFY:
Most of the information on Spotify is already filled out. You do not need to
change any of those settings.
Simply put in your Spotify username and password and click on the apply
button
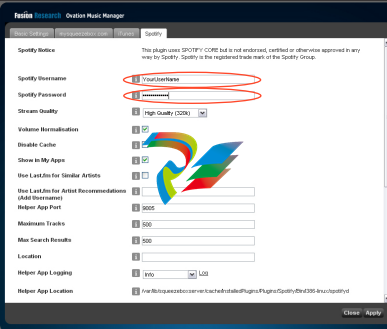
NOTE: Spotify requires a paid subscription to work with Ovation.
This is similar to Pandora and some of the other services.
OPTIONS FOR PLAYING YOUR OWN MUSIC:
You have many options for listening to your own music in an Ovation server:
1. Stream music from another computer/hard drive on the network
2. Sync a remote iTunes folder
PREPARING TO SHARE DIGITAL FILES:
When streaming music to an Ovation server from a remote folder, you’ll
first need to share the files on the remote computer where the music is
stored. Make sure that all the files are properly shared on these remote
computers before you begin.
NOTE: You must have a user name and password for the shared
folders on your remote computer.
You’ll also want to set a static IP on the remote computer, so the Ovation
knows to look to the same place every time music from the remote folder
is requested.
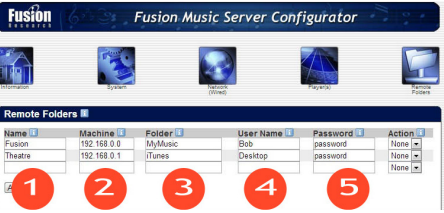
Next you’ll map the remote folder to the Ovation. To do this, open up the
Fusion Music Configurator and click on the [Remote Folders] button. Once
there, fill in the following information:
-
 Hirschmann RS20-1600M2T1SDAEHH03.1.02 Rail Switch
 -
 Hirschmann BRS30-24TX Industrial Rail Switch
 -
 Hirschmann RSPM20-4T14T1EV9HHS999.9.99 Managed Ethernet Switch
 -
 Hirschmann BELDEN RS40-0009CCCCSDAPHH09.0.14 / RS400009CCCCSDAPHH09014
 -
Hirschmann RS40 Rail Switch RS40-0009CCCCSDAE
-
 Hirschmann BELDEN RS30-0802T1T1SDAP / RS300802T1T1SDAP Fully Managed Layer 2 Compact Rail Switch
 -
 Hirschmann BELDEN RS20-0800M2M2SDAUHH / RS200800M2M2SDAUHH
 -
 Hirschmann EAGLE30-04022O6TT999SCCY9HSE3F Industrial Firewall Router Switch
 -
 Hirschmann RS20-1600T1T1SDAEHH09.0.14 RS20 Rail Mount Ethernet Switch
 -
 Hirschmann EAGLE0200T1T1TDDY90000HHE05.3.03 Industrial Security Router
 -
Hirschmann - BELDEN MIPP-AD-1L9P
-
 HIRSCHMANN RSPM20-4Z64Z6TV9HHS9 942 106-999 RAIL SAFETY SWITCH
 -
 HIRSCHMANN FIBEROPTIC MODULE FIP P/N: OZDFIPG3T
 -
 HIRSCHMANN RS20-1600M2M2SDAUHH Ethernet rack-mounted switch
 -
 HIRSCHMANN BELDEN RS20-0400T1T1SDAEHH04.0.01 / RS200400T1T1SDAEHH04001
 -
HIRSCHMANN MM2-4FXM3 MICE Media Module
-
HIRSCHMANN RS20-0800M2M2SDAE Industrial Ethernet Rail Switch
-
 Hirschmann RS20-2400T1T1SDAP / RS20-2400T1T1SDAPHH05.0.02
 -
 GE MLJ1005B010H00C MLJ Digital Synchromism Check
 -
 ALSTOM MICROTECH DX21-M2 Digital Excitation Controller
 -
HIRSCHMANN BRS20-1200ZZZZ-STCY99HHSES
-
 HIRSCHMANN MM3-4FXM2 MICE Media Module
 -
Hirschmann RSB20-0800T1T1SAABHH 8Port ENet Rail Switch RSB20
-
 Hirschmann MACH102-8TP Ethernet Switch
 -
 SAACKE DDZ-M marine steam pressure atomizer
 -
 SAACKE SKV-A marine rotary cup atomizer
 -
 SAACKE Seavis HMI05e
 -
 Kollmorgen MMC-SD-2.0-230 Servo Drive 100-240VAC 2KW 10A Output 3PH 100-240VAC
 -
 Kollmorgen Servo drive CR10550
 -
 Kollmorgen AKD-P01207-NACN-0054 Servo Driver
 -
 Kollmorgen S406M-CA-036 Servostar
 -
.png) Kollmorgen AKD-B02407-NAAN-0000 Digital Servo Drive
Kollmorgen AKD-B02407-NAAN-0000 Digital Servo Drive -
 Kollmorgen SERVOSTAR S406AM-CA Digital Servo Drive
 -
 KOLLMORGEN SERVOSTAR 603-AS SERVO AMPLIFIER_SERVOSTAR603AS_S60301
 -
Kollmorgen S700 Servo Controller (S70602-NANANA-NA)
-
 Kollmorgen MPK411 controller
 -
 KOLLMORGEN MMC-SD-1.3-460-D Smart Drive
 -
 KOLLMORGEN AKM21C-CKB2AA-00 / AKM21CCKB2AA00 Servomotor
 -
 BECKHOFF AX5106-0000-0200 | Digital Compact Servo Drives 1-channel
 -
 BECKHOFF C3620-0000 INDUSTRIAL COMPUTER (MOTORSHELVES)
 -
 Beckhoff EK1960-0000 TwinSAFE Compact Controller
 -
 Beckhoff C6930-0050 Control Cabinet Industrial PC
 -
 Beckhoff CP7711-0001-0030 Industrial Computer Detection
 -
 Beckhoff CX1001-0111 Embedded PC CPU Module
 -
 Beckhoff C6017-0020 | Ultra-compact Industrial PC
 -
 Beckhoff EK1322 | 2-port EtherCAT P junction with feed-in
 -
 Beckhoff CP2219-0010 Panel
 -
 BECKHOFF C6015-0020 ULTRA COMPACT INDUSTRIAL PC
 -
 BECKHOFF CX2030-0120/Standard CPU Module Embedded PC Windows PLC controller
 -
 Beckhoff CP7721-1090-0020 Panel PC
 -
 Beckhoff PC CPU Module CX5130-0175
 -
 Beckhoff C6920-0050 Control Cabinet
 -
 Beckhoff EL6631 EtherCAT 2-Port Communication Interface, Profinet RT Controller
 -
 Beckhoff CP6202-0001-0060 touch screen panel PC
 -
 Beckhoff CP3916-1002-0000 Multi-Touch Control Panel
 -
 Beckhoff EP1809-0021 | EtherCAT Box, 16-channel digital input, 24 V DC, 3 ms, M8Preferred type
 -
 Beckhoff CX8190 PLC Embedded Industrial PC Ethernet Controller
 -
 Beckhoff CX2100-0914 Power Supply for External
 -
 Beckhoff Automation CP6906-0001-0000 HMI
 -
 Beckhoff EP7342-0002 Module
 -
 Beckhoff CX1020-0112 / CX1100-0910 / CX1020-N010 / CX1100-0003 Windows CPU
 -
 Beckhoff EP7211-0034 EtherCAT Box 1 Channel Motion Interface
 -
 Beckhoff C6240-0030 Control cabinet Industrial PC
 -
 beckhoff motherboard CB1052-0004 CB1052-0004
 -
 Beckhoff AX2006-AS Servo Drive / Variable Frequency Drive
 -
BECKHOFF CP6207-0001-0020 NSMP
-
 Beckhoff C6930-1142-0060 Industrial Computer
 -
 Beckhoff FC7501-0000 interface card
 -
 Beckhoff CX5140-0175 Embedded PC PLC CPU CX5140 Industrial Controller
 -
 Beckhoff CP7802-1100-0010: High-End IP65 Control Panel with DVI/USB Extended Interface
 -
BECKHOFF CP3716-1058-0010 CONTROL PANEL
-
 Beckhoff AX8108-0000 Single-Axis Module
 -
 Beckhoff CU8851-0000 | USB extension, USB Extended 2.0 receiver box
 -
Beckhoff C6017-0030 | Ultra-compact Industrial PC
-
 Beckhoff CX1001-0120/CX10010120.cx1000-n001.cx1000-n000 System Overview
 -
 Beckhoff CPU Module CX5140-0155/4GB CPU Module
 -
 Beckhoff CP6533-0001-005: Built-in Panel PC with High-Definition Multi-Touch Control
 -
 Beckhoff EL5042 | EtherCAT Terminal, 2-channel encoder interface, BiSS® C
 -
 Beckhoff C6920-1080-0040: Premium Control Cabinet Industrial PC
 -
 Beckhoff C6920-0060 | Control cabinet Industrial PC
 -
 Beckhoff Embedded-PC CX5010-1121
 -
 Beckhoff CB3050-0010 Mainboard Motherboard
 -
 Beckhoff PLC module CX1020-0000 Basic CPU module (service phase)
 -
 Beckhoff CP7812-1056-0010 15" Multitouch Display Control Panel
 -
 Beckhoff CX5120-0115 /2GB Controller Module
 -
 Beckhoff CP7201-1000-0000 Industrial Panel PC
 -
 Beckhoff Servo Motor AM8061-0JH1-0000
 -
 BECKHOFF CP6503-0001-0050 Built-in Panel PC
 -
Beckhoff CP3919-0010 Display G190ETN01.2 19" PCT V04. Multi-touch Control Panel
-
 Beckhoff CX5110-0112-9020/000368201 Embedded PC Intel Atom Processor
 -
 Beckhoff AX8206-0000 Dual-Axis Module
 -
Beckhoff Nail Operating Terminal CP7032-1031-0010
-
Beckhoff AM8042-0EH1-0000 Servomotor 4.10 Nm (M0), F4 (87 mm)
-
 Beckhoff EK9300 Beckhoff CPU Module
 -
Beckhoff CP3224-0020 Multitouch-Panel-PC
-
 Beckhoff CP2712-0000 12.1" 24VDC Touch Screen WMD0
 -
 BECKHOFF CX5240-0195 / 0000289234 Embedded PC 40 GB CFast Card
 -
 Beckhoff CP6932-1000-0000 Control Panel
 -
 BECKHOFF CX5120-0121 PLC Module
 -
 Beckhoff EL3218 | EtherCAT Terminal, 8-channel analog input
 -
Beckhoff C6640-0050 | Control cabinet Industrial PC
-
 Beckhoff Cx5130-0120/4GB Embedded-PC
 -
 BECKHOFF CX2030-0122 PLC PROCESSOR
 -
 BECKHOFF CX5020-0122 Controller Module
 -
 Beckhoff CP3915-0000 Multitouch Panel
 -
 BECKHOFF EL3014 | EtherCAT Terminal
 -
 BECKHOFF Industrial Computer c6920-1057-0030
 -
 Beckhoff CX5130-0141/4GB CX5130-0141 Embedded PC
 -
 Beckhoff C6240-1052-0040 4-086-06-3073 Industrial Computer
 -
 Beckhoff CX5140-0135 /4GB High-Performance Embedded Industrial PC
 -
 Beckhoff C6515-1001-0000 Industrial PC
 -
 Beckhoff AX5103-0000-0200 - Digital Compact Servo Drives
 -
 Beckhoff CX2030-0130-1003/4GB Basic CPU module
 -
 Beckhoff AX8620-0000 Power Supply Module
 -
 Beckhoff CX9020-0111 module with
 -
 Beckhoff EL7332 PLC Module
 -
 BECKHOFF CP7709-0001-0020 HMI
 -
 Beckhoff CX5120-0155/2GB Embedded PC
 -
 BECKHOFF CP7037-1037-0010 OPERATOR INTERFACE TOUCHSCREEN
 -
 Beckhoff EK9000 | ModbusTCP/UDP Bus Coupler
 -
 Beckhoff Touch Panel Screen CP6020 -0000-0000
 -
 Beckhoff CX2020-0121 Module FAST Shipping
 -
 Beckhoff CX2030-0125 Basic CPU Module
 -
 Beckhoff CP3918-0000 Multi-Touch 18.5" Control Panel
 -
 Automotion LC4A00010 DC BL Motor Control, ATS, Sub Assy, SCP, 115VAC,
 -
 500T-115VAC - VAS ENGINEERING - DORIC 500 SERIES DIGITAL TEMP INDICATOR
 -
 Honeywell X-DCS2000/EN Digital Integrated System Manager 50/60Hz 100-240V #4
 -
 Kollmorgen S60600 Servostar600 606-Fan 4 kVA, 6 A, 3 X 230 - 480 V


